
240z Window Glass Installation
Installing the door window glass is a major pain in the ass. Hopefully this will help.
Few things with a Z are as difficult and maddening as installing and adjusting the door window glass. Unfortunately, this page only applies to the 240z series because the regulator and guides are different for a 260z or 280z. Before starting, take a look at the door latch mechanism. Make sure it's in good condition because if it needs any repairs, the window glass has to come out. Take a look at the plastic rollers on the regulator mechanism's arms. Chances are they need to be cleaned and lubricated. You can use carb spray cleaner to dissolve the old grease. Roll them back and forth until you don't feel any grit or friction. Use lithium spray to lubricate them. Only use lithium for the rollers and guides and door latch mechanism because unlike axle grease, lithium doesn't turn gummy during freezing weather. When you buy the stuff, make sure it has the little straw so that you can aim it in tight places. Is the rubber strip on the frame that acts as a rain shield in decent shape? If not, now's the time to replace it. Inside the window frame is a channel with a "fuzzy" lining that helps seal against any drafts and also prevents the glass from getting scratched. Is it in decent shape or in tatters? If it's worn or tattered, now's the time to replace it. You can order it online but any local glass shop will be able to sell you some. Make sure to take part of it with you so they'll know what size to use.
The Regulator Mechanism
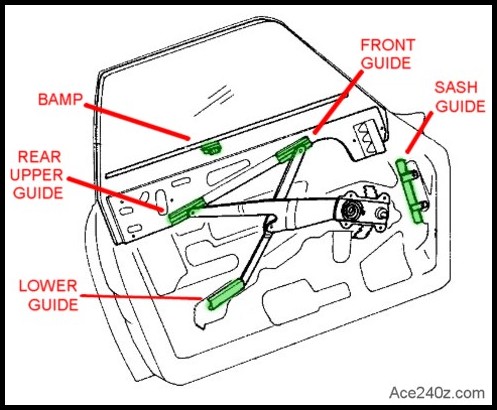 Hidden inside the door is the regulator mechanism and here's what it looks like.
When you turn the hand crank, the upper arms act like a pair of scissors and move toward each other, and as the ends move upward they raise the glass. Each arm has a plastic roller on the end of it, and the rollers fit inside metal guides on the glass frame. There is also a guide at the bottom that attaches to the door. Those guides keep the window level as it rises.
At the front is a sash guide that moves the glass front to back to keep it aligned with the rear of the window frame.
At the very top is a "bamp" roller, which is very important because it pushes the glass "inward" to keep it in the frame track. Without it, the glass won't close all the way. You can find them at Z specialty stores and occasionally on eBay.
It the middle of the mechanism, next to where the crank handle attaches, is a very strong coil spring. When you roll the window down, you tighten the spring. When you roll the window up, the springs helps lift it.
Hidden inside the door is the regulator mechanism and here's what it looks like.
When you turn the hand crank, the upper arms act like a pair of scissors and move toward each other, and as the ends move upward they raise the glass. Each arm has a plastic roller on the end of it, and the rollers fit inside metal guides on the glass frame. There is also a guide at the bottom that attaches to the door. Those guides keep the window level as it rises.
At the front is a sash guide that moves the glass front to back to keep it aligned with the rear of the window frame.
At the very top is a "bamp" roller, which is very important because it pushes the glass "inward" to keep it in the frame track. Without it, the glass won't close all the way. You can find them at Z specialty stores and occasionally on eBay.
It the middle of the mechanism, next to where the crank handle attaches, is a very strong coil spring. When you roll the window down, you tighten the spring. When you roll the window up, the springs helps lift it.
Before You Get Started It's helpful to have a copy of the Factory Service Manual. Find the page for installation and print a copy of it to have at hand when doing this installation. It's also helpful to clip the crank handle to the shaft because it tends to fall off while you're trying to run the mechanism up and down. It's very, very helpful to have a friend help. You can do the installation by yourself, but holding the glass up gets very tiring and you definitely do not want it to slip and drop. The glass itself is pretty strong, but nobody makes it any longer. Look online and you'll see how much a replacement window will cost. Used glass ain't cheap.
Step One
 Put some masking tape on both sides of the opening at the top of the door. It'll help prevent getting any scratches on the glass.
Reach inside the door and slide the lower guide over the lower roller. Crank the mechanism slightly up and down, and slide the guide back and forth until the guide's threaded studs poke thru the mounting holes. Use nuts (with flat washers and lock washers) to secure it loosely in place.
Crank the mechanism as needed until the upper arms are about halfway up.
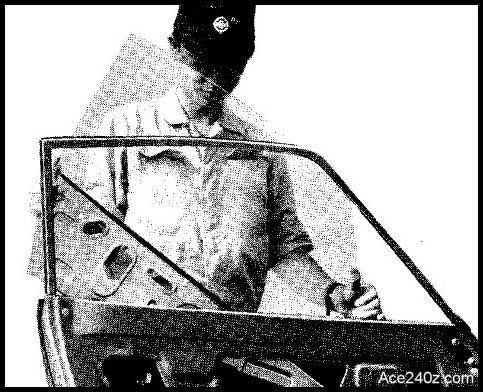
Notice in the photo how far down the front is tipped. The door opening at the front is slightly wider to allow the frame and sash to fit inside.
Carefully, cautiously slide the glass down thru the opening. It's tricky, especially at the rear. I've found that you can press your thumb against the glass and use your fingers to gently pry the opening a little further apart.
Don't let the glass drop inside because it can get scratched pretty easily. Slowly lower it until it rests atop the rollers, then slide it all the way forward.
Put some masking tape on both sides of the opening at the top of the door. It'll help prevent getting any scratches on the glass.
Reach inside the door and slide the lower guide over the lower roller. Crank the mechanism slightly up and down, and slide the guide back and forth until the guide's threaded studs poke thru the mounting holes. Use nuts (with flat washers and lock washers) to secure it loosely in place.
Crank the mechanism as needed until the upper arms are about halfway up.
Notice in the photo how far down the front is tipped. The door opening at the front is slightly wider to allow the frame and sash to fit inside.
Carefully, cautiously slide the glass down thru the opening. It's tricky, especially at the rear. I've found that you can press your thumb against the glass and use your fingers to gently pry the opening a little further apart.
Don't let the glass drop inside because it can get scratched pretty easily. Slowly lower it until it rests atop the rollers, then slide it all the way forward.
Step Two This is the most difficult part and where a friend can be handy. At the top of the door, peek between the glass and the inside of the opening to see where the front roller is. Slowly crank the arms up and down until the rear of the front guide (on the glass frame) is near the roller. Slide the glass back and slip the guide over the roller. It's difficult to see and very difficult to do. It'll probably take a few tries. Now peek down at the rear guide and crank the mechanism up and down until the roller is aligned with the rear of the guide, then slide the glass back until the guide slides over the roller. Take a breather. If a friend has been helping, ask them to bring you a beer.
Step Three Roll the window up to the top of the frame and install the front sash guide. It's nearly impossible to see the plastic piece it slides over, so it can be a little fiddly. The sash guide has two tabs that hold it to the door. Use screws (with flat washers and lock washers) to secure it loosely in place. Clip the "bamp" roller on the outside of the frame. There are different ones for the left and right door. The glass installation is done and you saved a pocketful of cash by not taking it to a specialist.
Adjustments Now it's time to adjust the guides until the window slides freely and closes snugly. It's a process that I can't explain because it's something you have to figure out with some trial and error. Note: the trim on the outside of the window opening (a chrome channel with rubber weatherstripping) needs to be in place because, like the "bamp", it helps push the window inward and keep it in the upper frame. All of the adjustment is done with the lower guide and the front sash guide. It'll probably take several up & down cycles to get it lined up properly. Be very careful when the glass is near the top because the rear upper guide is barely long enough to keep the roller in place and it might pop out. It happened to me several times.
Lubrication Spray the roller guides and the front sash guide with lithium grease. Be generous - you don't want anything getting sticky after doing all of that maddening work. Now you can do the other door.